How to connect and set up a UniFi access point: a step-by-step guide for small offices and workshops
A Ubiquiti UniFi access point is a popular answer to poor Wi-Fi at work, and the unit itself is screwed to the ceiling within fifteen minutes. The real work is in the choices around it: which console, which PoE class, which settings. This guide runs from unboxing to a working guest network, with Ubiquiti's own prices and recommendations as of 28 September 2026.
Published 28 September 2026 · 14 min read · by Joep de Kok, IT specialist at Geekie Creative & IT · Lees dit artikel in het Nederlands
How UniFi fits together: access point, console and PoE
A UniFi access point is deliberately kept simple: it broadcasts Wi-Fi and nothing else. All settings, users and updates come from a central console, the software Ubiquiti calls UniFi Network. That is why five access points behave as one network your phone switches between without noticing, and why you see on one screen who is connected. That is also exactly why the system is so popular with businesses: according to market researcher IDC, Ubiquiti grew 49% in the fourth quarter of 2025 and held 11.7% of the worldwide enterprise Wi-Fi market (IDC, March 2026).
1 · Access point
Broadcasts the Wi-Fi
On the ceiling or high on the wall. Gets power and data through one network cable and has no settings screen of its own.
2 · Console
Manages everything
A small box (Cloud Gateway, Express, Dream Router) or software on a PC. This is where you create networks, see devices and run updates.
3 · PoE
Supplies the power
Power over Ethernet: a PoE switch or a separate PoE adapter sends power over the network cable, so no power socket on the ceiling.
It also works without a console: in the UniFi app you scan the QR code on the back and set up a single access point on its own. Ubiquiti calls this ‘standalone’ and is honest about it: each access point then has to be configured separately, devices do not roam seamlessly between access points and remote management is missing (Ubiquiti, Standalone Access Points). For a business with more than one access point a console is not optional. What else a good business network needs, from PoE switch to cabling, is in our article on stable Wi-Fi at work with access points (in Dutch).
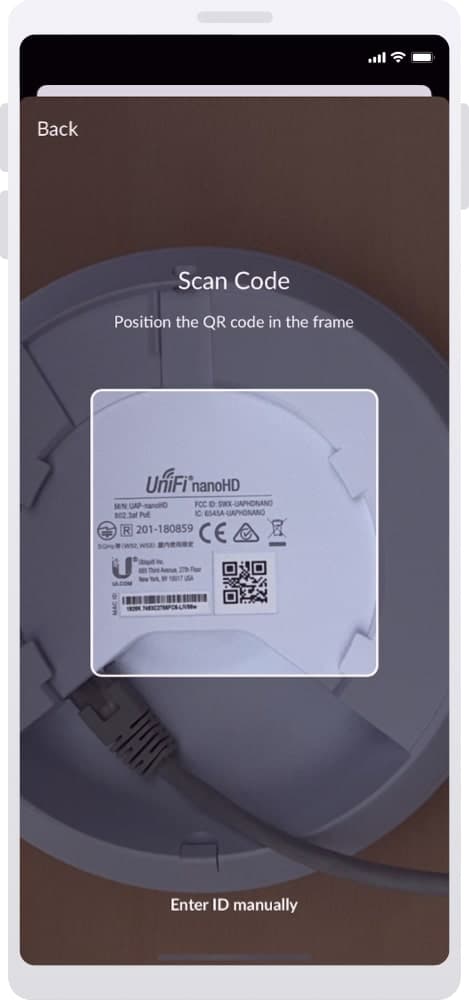
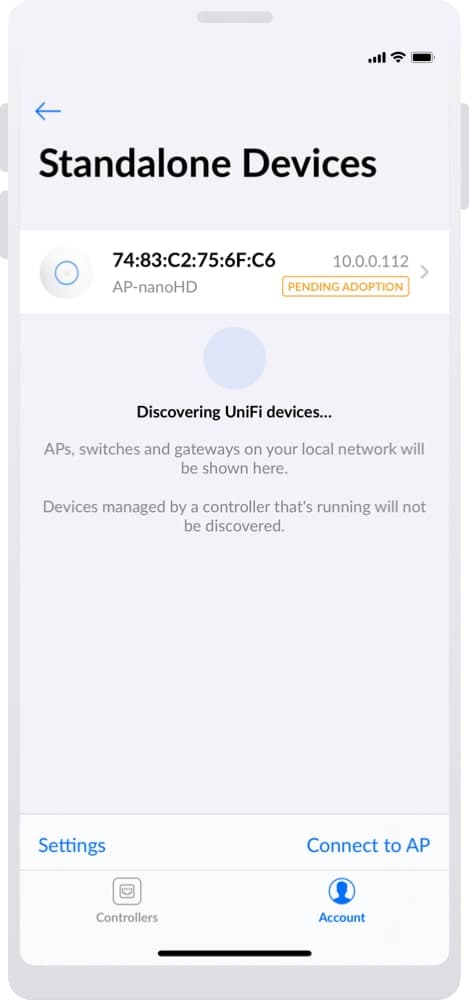
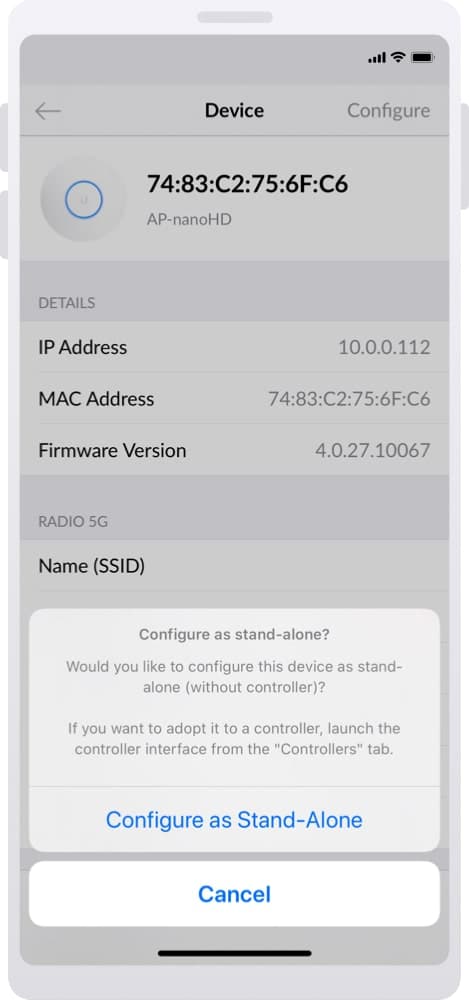
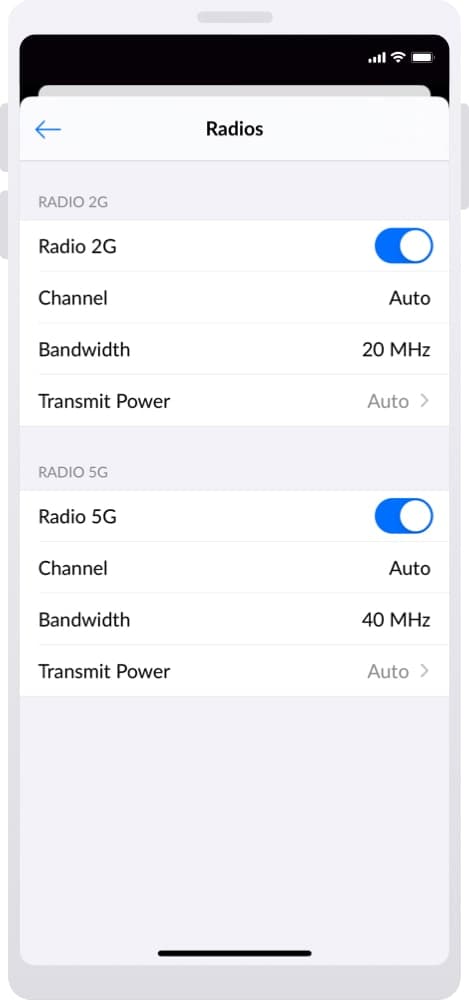
Screens from an older version of the UniFi Network app; the steps are the same, the design has changed slightly since.
Which console suits your business?
For most small businesses the Cloud Gateway Ultra at 90 euros is the best start: it replaces the router function of your provider modem, manages up to 30 UniFi devices (techspecs.ui.com) and has no Wi-Fi of its own, which is fine because the access points handle that. These are the options Ubiquiti sells in Europe, with prices including VAT as of 28 September 2026:
| Console | Price | Router too? | Who it is for |
|---|---|---|---|
| Cloud Gateway Ultra | €90 | Yes | Cheapest option. Router plus console, no built-in Wi-Fi, four LAN ports without PoE. |
| UniFi Express 7 | from €179 | Yes | Router plus console with built-in Wi-Fi 7. For a very small office sometimes enough without a separate access point. |
| Dream Router 7 | €250 | Yes | Router, console and Wi-Fi 7 in one, with one PoE port for an extra access point. |
| Cloud Key G2 Plus | €179 | No | Console only. You keep your own router. Out of stock at the time of writing. |
| UniFi OS Server (self-hosted) | free | No | Software on a PC or server that must stay on. Ubiquiti recommends it only for experienced administrators. |
| Official UniFi Hosting | from €29 per month | No | Console in Ubiquiti's cloud, no device of your own needed. |
All prices are from the European UniFi store. Self-hosting sounds attractive because it is free, but Ubiquiti itself writes that it is only suitable for people proficient in network administration, because the software has to run permanently and needs attention (Ubiquiti, How to Set Up UniFi). For a business without its own administrator, a 90-euro box that simply stays on is the better choice. Note that the new UniFi OS Server cannot manage Cloud Gateways; it is one or the other.
Which access point suits your building?
In 2026, buy a Wi-Fi 7 model, even if your laptops do not support it yet. The price difference with Wi-Fi 6 has disappeared (the U7 Lite and the U6+ both cost 89 euros) and the market is shifting fast: Wi-Fi 7 accounted for 37% of all indoor access points shipped in the first quarter of 2026 (Dell’Oro, June 2026) and the Wi-Fi Alliance expects 1.1 billion Wi-Fi 7 devices this year (Wi-Fi Alliance via Wi-Fi NOW, January 2026). The models worth considering for a small business:
| Model | Wi-Fi | Power | Coverage | Devices | Price |
|---|---|---|---|---|---|
| U7 Lite | Wi-Fi 7 | PoE (802.3af) | 115 m² | 200+ | €89 |
| U6+ | Wi-Fi 6 | PoE (802.3af) | 140 m² | 300+ | €89 |
| U7 Long-Range | Wi-Fi 7 | PoE (802.3af) | 160 m² | 300+ | €145 |
| U6 Pro | Wi-Fi 6 | PoE (802.3af) | 140 m² | 250+ | €145 |
| U7 Pro | Wi-Fi 7 + 6 GHz | PoE+ (802.3at) | 140 m² | 300+ | €160 |
| U7 Outdoor | Wi-Fi 7 | PoE+ (802.3at) | 465 m² | 250+ | €185 |
| U7 Pro Max | Wi-Fi 7 + 6 GHz | PoE+ (802.3at) | 160 m² | 500+ | €250 |
Coverage and device counts are Ubiquiti's figures on techspecs.ui.com for an open space; prices are from the European UniFi store. The U6 Lite and U6 Long-Range are no longer in the range; the U7 Lite and U7 Long-Range are their successors.
How to choose
- Office up to about 10 desks: U7 Lite. Cheap, Wi-Fi 7, works on any PoE port. No 6 GHz, but you will not miss that in a small office.
- Busy office, lots of video calls, new laptops: U7 Pro. The 6 GHz band is released for indoor use in the Netherlands and is virtually empty where you are, so the neighbours do not interfere. Needs PoE+.
- Workshop, warehouse or long corridor: U7 Long-Range, with the largest range in the line-up. With metal and machinery, still prefer two smaller units over one big one.
- Terrace, loading yard or outdoor storage: U7 Outdoor, splash-proof and rated for -30 to 60 °C.
- Hotel or practice rooms with a network socket in the wall: U7 In-Wall (135 euros) replaces the wall socket and adds wired ports.
On 6 GHz: the Dutch government released the 5945 to 6425 MHz band for Wi-Fi at the end of 2021 (Staatscourant 2021, no. 49492), licence-free but indoor only and at limited power. Ubiquiti has supported 6 GHz in the Netherlands since UniFi Network 7.2 (Ubiquiti, Regions Supporting 6 GHz). Range on 6 GHz is shorter than on 5 GHz, so place the access points a little closer together.
How many access points, and where?
Ubiquiti gives the rule of thumb itself: most UniFi access points cover 95 to 185 square metres, but because walls and obstacles weaken the signal, the brand recommends at least one access point per 95 square metres (Ubiquiti, UniFi WiFi). For a 200 square metre office that means two to three units. A building with many partition walls, concrete, cold rooms or a workshop full of metal sits at the top of that estimate or above it.
Do not guess, draw. The free UniFi Design Center imports a floor plan as an image or PDF, detects the walls itself and draws a coverage map with channel advice per access point. With the free WiFiman app you walk the building after installation and see the signal strength at every spot. Three placement rules that almost always apply:
- On the ceiling, in the middle of the room. An access point radiates downwards and sideways; on a cabinet or behind a monitor you lose half of it.
- Prefer several small ones over one big one. Two U7 Lites at 89 euros cover a floor better than one U7 Pro Max at 250 euros that has to get through three walls.
- Overlap is good, provided the channels differ. Devices only switch access point when they see a stronger signal; that needs some overlap. Channel AI sorts the channels in step 4.
Step 1: connect the access point via PoE
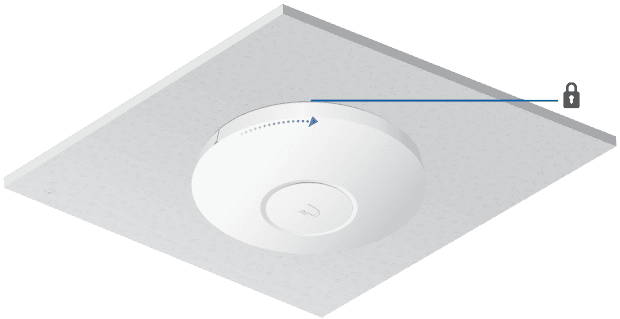
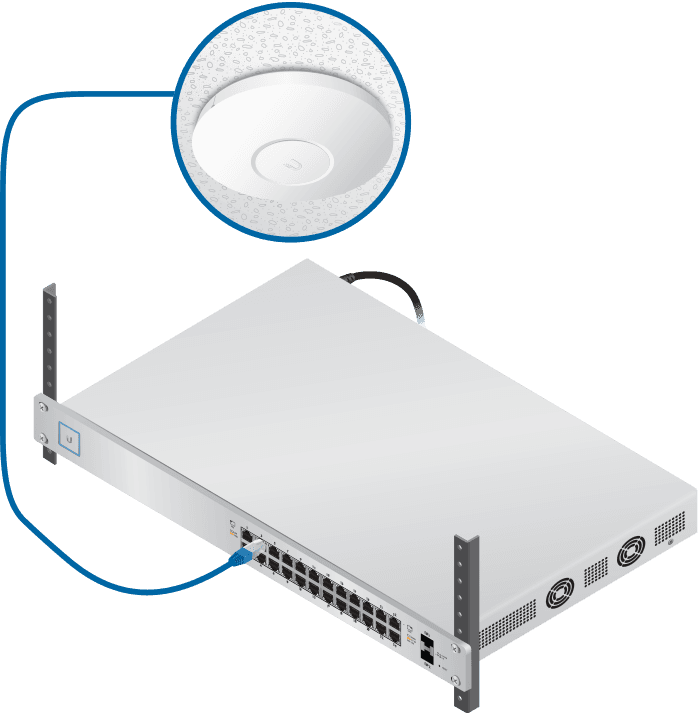
After this step the access point is in place, has power and its LED is steady white. Screw the mounting plate to the ceiling or wall (the wall plugs are in the box), pull the network cable through and click the access point onto the plate. The cable goes to one of these two:
Mounting on a wall
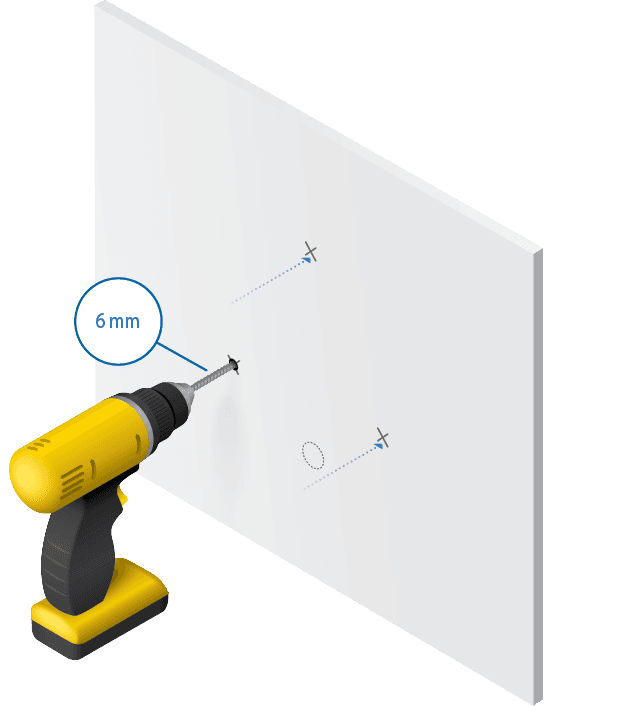
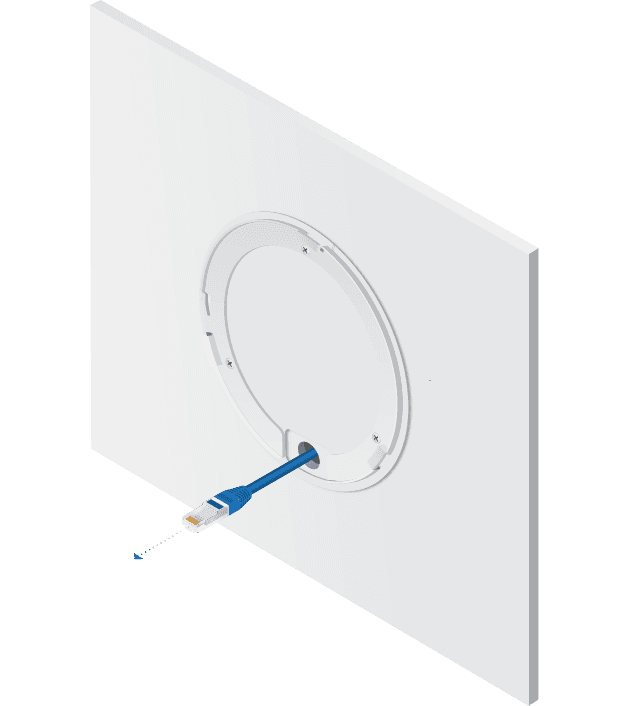
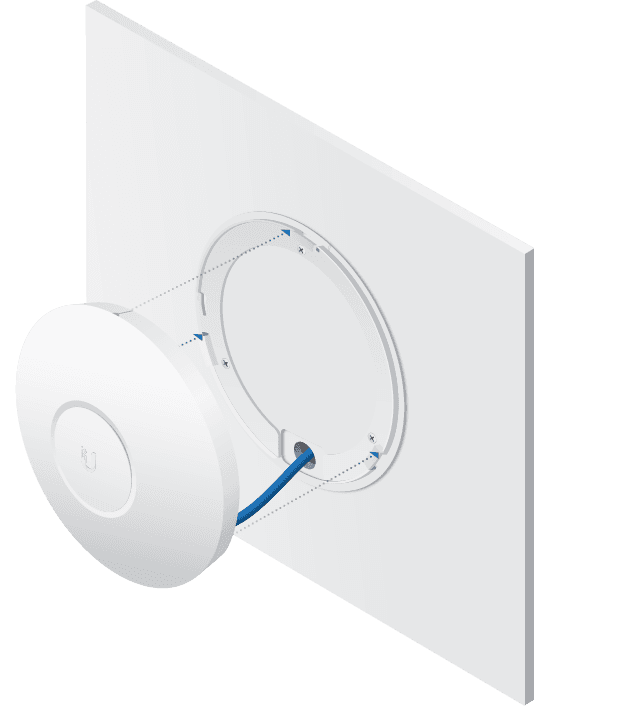
Mounting on a suspended ceiling
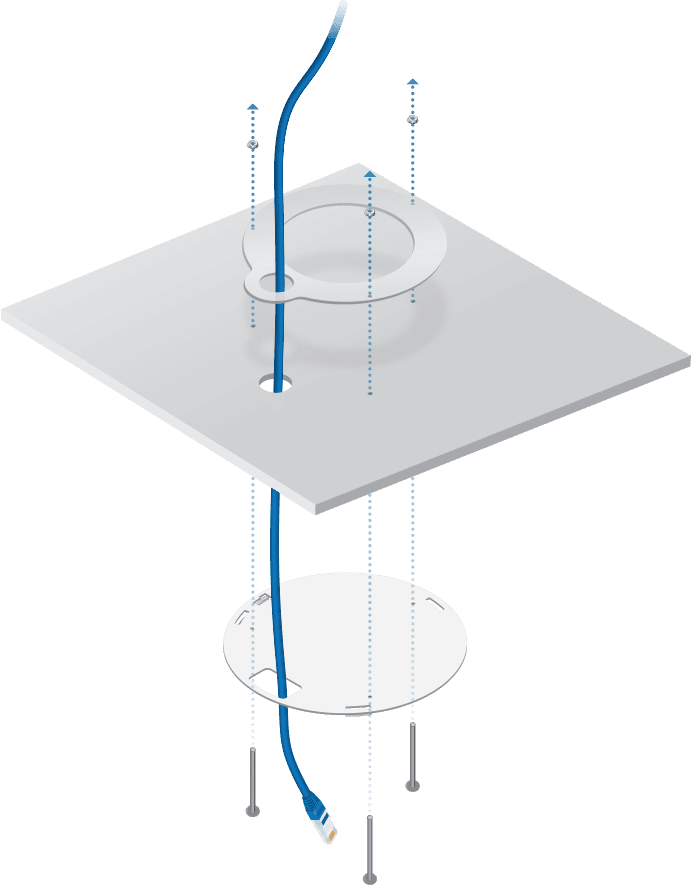
Power via PoE
- A PoE port on your switch. The tidiest solution from three access points upwards; how such a switch fits into a good business network is in our Wi-Fi article (in Dutch). Check that the switch delivers the right class: standard PoE (802.3af) gives 15.4 watts per port, PoE+ (802.3at) 30 watts (Ubiquiti, PoE Availability and Modes).
- A PoE adapter (injector). A small block between your ordinary switch and the access point, with a ‘LAN’ and a ‘PoE’ port. The access point goes on the PoE port. Ubiquiti sells them separately for 7 euros (15 watts) to 17 euros (30 watts, 2.5 GbE); only the U6 Mesh includes one in the box.
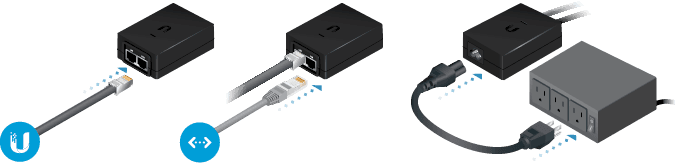
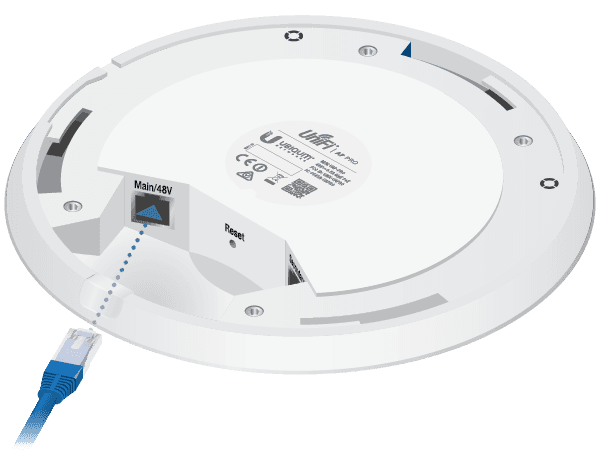
This is the mistake we see most often: a U7 Pro on a switch that only delivers standard PoE. The access point boots, but drops out under load or switches radios off. If your switch only says ‘PoE’ or ‘802.3af’, choose a U7 Lite or U6+, or put a PoE+ adapter in between. After connecting, the LED flashes white for a minute (booting) and then turns steady white: ready for adoption.
Step 2: bring the UniFi console online
After this step a UniFi Network console is running on your network and the provider modem's Wi-Fi is off. If you already have a console, skip this step.
- Connect the WAN port of the Cloud Gateway or Express to a LAN port of the modem from KPN, Ziggo or Odido. The modem does not need bridge mode; double NAT is rarely a problem for a small office.
- Connect your switch (and with it the access points) to a LAN port of the console.
- Open the UniFi app on your phone (the app is simply called ‘UniFi’; the Wi-Fi part inside it is UniFi Network), create a Ubiquiti account or sign in, and follow the setup. Choose a name for the network and a strong password; you can still change those in step 4.
- Then switch off the provider modem's Wi-Fi via the modem's admin page. Two Wi-Fi networks side by side interfere with each other and your devices keep clinging to the wrong one.
If you choose the Cloud Key G2 Plus or UniFi OS Server on a PC, your current router simply stays the router and you connect the console to a LAN port. On a PC the minimum is 2 GB of memory and 10 GB of disk space, and the software must run at all times (Ubiquiti, Self-Hosting UniFi).
Step 3: adopt the access point in UniFi Network
After this step the access point belongs to your console, its LED is steady blue and it appears under Devices. Adopting is nothing more than telling the console: this one is mine.
- Open the UniFi Network app or the console's web interface and go to Devices.
- The access point is listed as Pending Adoption. Click Adopt. Ubiquiti documents Bluetooth adoption from your phone only for U6 models; with U7 models it goes through the network (Ubiquiti, Bluetooth APs).
- The console immediately installs the latest firmware. The LED alternates quickly between white and blue; do not cut the power during those minutes.
- Give the access point a recognisable name (‘Canteen’, ‘Workshop rear’) and repeat this for each further unit.
What the LED tells you
| LED | Meaning |
|---|---|
| Flashing white (every half second) | The device is booting. Wait a moment. |
| Steady white | Ready for adoption. This is the moment for step 3. |
| Steady blue | Adopted and operating normally. This is how it should stay. |
| Quickly alternating white and blue | Firmware is being upgraded. Do not power off. |
| Blue, briefly off every 5 seconds | Lost its network connection and is searching for a wireless uplink. Check the cable. |
| Rapidly flashing blue | The 'Locate' feature was activated from the console. |
| Off | No power. Check the PoE port or the injector. |
Taken from Ubiquiti, Understanding Device LED Status Indicators.
If adoption fails
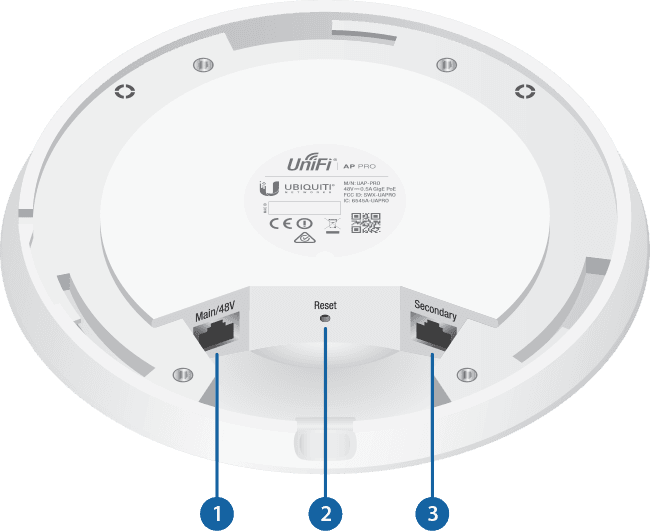
If the status sticks at Adoption failed or Managed by other, the access point still knows an old console. With power connected, hold the reset button for 5 to 10 seconds until the LED indicates the restore has begun, wait for steady white and adopt again (Ubiquiti, Reset to Factory Defaults). If the console is on another network or in the cloud, the access point needs the console's address via set-inform over SSH or via DHCP option 43; Ubiquiti rightly calls that work for advanced users (Ubiquiti, Remote Adoption).
Step 4: configure the Wi-Fi network
After this step all access points broadcast the same business network with secure encryption and sensible channels. In the console go to Settings → WiFi, open the network you created in step 2 and go through these settings. The recommendations come from Ubiquiti's own guides.
| Setting | Recommendation | Why |
|---|---|---|
| Security | WPA2/WPA3 | Works with virtually every device from the past ten years. WPA3 only is required for MLO and locks out older devices. |
| PMF (protected management frames) | Optional (default) | 'Required' breaks older printers and scanners; 'Disabled' only on a separate network for legacy devices. |
| Band steering | On | Steers devices to 5 GHz whenever possible; 2.4 GHz is left for what cannot do otherwise. |
| Channel width 2.4 GHz | 20 MHz, channel 1, 6 or 11 | Wider only adds interference on 2.4 GHz, especially with neighbours in the same building. |
| Channel width 5 GHz | 80 MHz (small office) or 40 MHz (busy building) | 80 MHz is faster, 40 MHz more stable with many access points close together. |
| Transmit power | Auto, or Medium with several access points | At full power access points hear each other too well and phones cling too long to a distant access point. |
| Channels | Channel AI: Optimize → Apply | Measures the environment and spreads the channels across all access points, per band. |
| Minimum RSSI | Off | Only useful in a very dense deployment; otherwise it kicks devices off the network. |
Sources for this table: SSID and AP Settings Overview, Maximizing Wireless Speeds, Optimizing WiFi Connectivity and Channel AI, all from Ubiquiti.
6 GHz and MLO on Wi-Fi 7 models
If you have a U7 Pro or U7 Pro Max, enable 6 GHz on the main network; the console automatically selects WPA2/WPA3, because 6 GHz only works with WPA3 (Ubiquiti, Getting Started with 6 GHz). Leave Multi-Link Operation (MLO), where a Wi-Fi 7 device uses several bands at once, off for now: it forces WPA3, which according to Ubiquiti may limit connectivity with IoT devices, and the speed gain is not guaranteed (Ubiquiti, MLO in UniFi Network). For an office with printers, card terminals and a doorbell that is not a theoretical risk.
Step 5: create a guest network and a separate network for devices
After this step customers and visitors get online without reaching your files, printers or till, and your older devices sit on a network of their own that does not get in the way of the rest. This is the step most often skipped, and the one that counts most for the duty of care under NIS2 (article in Dutch).
Guest network
- Go to Settings → Networks and create a new network ‘Guests’ with its own VLAN. Enable Network Isolation so this network cannot see your other networks.
- Under Settings → WiFi create a second Wi-Fi network, attach it to ‘Guests’ and enable Client Device Isolation: guests then cannot see each other either.
- Optional: a hotspot portal with a welcome page and a password you change every month, and a speed limit per user so one download does not slow down the till.
This is literally the approach Ubiquiti recommends in Best Practices: Guest WiFi. If you do insist on an open guest network without a password, at least enable ‘OWE’ (encryption without a password), so nobody else on the network can read the traffic.
Device network
Printers, scanners, card terminals, cameras and that one doorbell are the devices that run into trouble with WPA3, PMF or 6 GHz. Give them a third Wi-Fi network with WPA2, PMF off, 2.4 and 5 GHz only and no MLO. That keeps the main network modern and secure without the printer going offline every week. Devices that do not move are better wired anyway; that keeps the Wi-Fi free for laptops and phones. Cabling and switch work is something our IT support team does as part of a network installation.
Checking that everything works
When everything is right, you see three things. Every access point is steady blue and shows in the console as Online with the latest firmware. In WiFiman you measure -65 dBm or better at every desk, the value Ubiquiti recommends for a stable connection (Ubiquiti, Optimizing WiFi Connectivity). And if you walk through the building on a video call on your phone, the call simply continues while the console shows you switching access point.
- Console → Devices: all access points Online, no warning about PoE budget or an uplink at 100 Mbit/s (which points to a bad cable).
- WiFiman → Floorplan: walk the building and save the measurement; spots below -70 dBm call for an extra access point or a different position.
- Guest network: connect with a phone and try to reach the printer or a shared folder. If that works, the isolation is not set correctly.
Common mistakes
Leaving the provider modem's Wi-Fi on
Two networks on the same channels in the same building, and phones that cling to the weak modem signal. Switch off the Wi-Fi of KPN, Ziggo or Odido as soon as the access points are running.
A PoE+ model on a PoE port
The U7 Pro, U7 Pro Max and U7 Outdoor ask for 30 watts. On an 802.3af port they boot, but drop out under load. Check the class of your switch or injector before you buy.
Access point on a cabinet or behind the monitor
An access point radiates downwards and sideways. On the floor or behind a screen the range halves and the expensive U7 Pro performs worse than a well-placed U7 Lite.
Everything at full power and 160 MHz
More power and wider channels sound faster, but with several access points they interfere with each other and devices switch too late. Auto or Medium, 80 MHz on 5 GHz, and Channel AI.
Not resetting a second-hand access point
'Managed by other' means the previous owner is still in it. Reset for 5 to 10 seconds first, then adopt.
Guests on the business network
The main network's password on a card at the front desk. Every visitor then sees your printers and NAS. A guest network with isolation takes fifteen minutes.
Frequently asked questions
Does a UniFi access point work behind my KPN or Ziggo modem, without a UniFi router?+
Yes. Your provider's modem stays the router and hands out IP addresses; the access point simply sits behind it via a PoE switch or PoE adapter. Do switch off the modem's Wi-Fi, otherwise two networks get in each other's way. Without a UniFi console the access point runs in 'standalone' mode via the UniFi app: fine for a single access point, but you lose seamless roaming between several access points, remote management and central settings. A Cloud Gateway Ultra for 90 euros gives you all of that, and it works behind the provider modem too.
Do I need a Cloud Key?+
Not necessarily. The Cloud Key G2 Plus is a console without a router and is regularly out of stock. A Cloud Gateway Ultra or UniFi Express 7 is cheaper and more complete: both combine router and console. If you do not want an extra device, you can install UniFi OS Server for free on a PC that stays on, or choose Official UniFi Hosting from 29 euros per month.
How many access points do I need for a 200 square metre office?+
Count on two to three. Ubiquiti recommends at least one access point per 95 square metres, because walls and cabinets cut the range considerably. An open office floor manages with two; a building with many partition walls, concrete or a workshop full of metal needs three or more. Draw your floor plan in the free UniFi Design Center for a coverage map, or have a site survey done.
Do I have to buy a PoE switch?+
Not required. For one or two access points a PoE adapter (injector) between your existing switch and the access point is enough; Ubiquiti sells them separately for 7 to 17 euros. From three access points upwards a PoE switch is tidier. Mind the class: the U7 Pro, U7 Pro Max and U7 Outdoor need PoE+ (802.3at, 30 watts); the U7 Lite, U6+ and U6 Pro run on standard PoE (802.3af, 15.4 watts).
What does 'Adoption failed' or 'Managed by other' mean?+
The access point still knows another console, for example from a previous owner or an earlier setup attempt, or it cannot reach the console. The fix is almost always a factory reset: with power connected, hold the reset button for 5 to 10 seconds until the LED indicates the restore has begun, wait for steady white and adopt again. If the console is on another network, the access point needs the console's address through a 'set-inform' command or DHCP option 43; that is a job for an administrator.
Sources
Prices, specifications and configuration advice come from Ubiquiti's store, spec pages and help centre, market figures from IDC, Dell’Oro and the Wi-Fi Alliance, and the frequency decision from the Dutch Government Gazette (Staatscourant), all retrieved on 28 September 2026.
- Ubiquiti EU store: All WiFi and All Cloud Gateways
- Ubiquiti techspecs: U7 Pro, U7 Lite, U7 Pro Max, U7 Long-Range, U7 Outdoor, U6+, U6 Pro
- Ubiquiti: How to Set Up UniFi
- Ubiquiti: UniFi Device Adoption
- Ubiquiti: Understanding Device LED Status Indicators
- Ubiquiti: PoE Availability and Modes
- Ubiquiti: UniFi WiFi SSID and AP Settings Overview
- Ubiquiti: Best Practices, Guest WiFi
- Ubiquiti: UniFi WiFi (coverage guidance)
- IDC: Worldwide Enterprise WLAN grew 13.9% (March 2026)
- Dell’Oro: WLAN market 1Q 2026 (June 2026)
- Staatscourant 2021, no. 49492: 6 GHz decision for WAS/RLAN
- Mounting illustrations and app screens: Ubiquiti (quick start guide and UniFi Network app)
Further reading
Rather have it done for you? We survey, mount and configure.
Geekie Creative & IT installs UniFi networks for businesses in the Rotterdam area: site survey, cabling, mounting, console and guest network. You get a fixed price up front and a coverage map of your building afterwards.